
Build a Better Duty Belt: Mission First, Gear Second
A well-designed belt system isn’t about carrying the most equipment—it’s about carrying the right equipment in the right place. Whether you’re a law enforcement officer, military professional, armed security officer, or prepared civilian, your belt should support your mission without becoming an obstacle.
The biggest mistake people make is buying gear first and figuring out where to mount it later. Instead, start by asking yourself one simple question:
What am I expected to do every single day, and what is the worst reasonable situation I may have to respond to?
Your mission should dictate your equipment—not social media or someone else’s loadout.
Mission Drives Equipment
Every assignment is different.
A patrol officer has different priorities than an executive protection specialist. A SWAT operator carries different equipment than a range instructor. Even two officers working different shifts may need different belt configurations.
Build your belt around your daily responsibilities while ensuring you have the equipment needed for the problems you’re most likely to encounter.
Avoid carrying gear “just because there’s room.”
Every ounce and every inch of belt space should serve a purpose.
Start at the Centerline
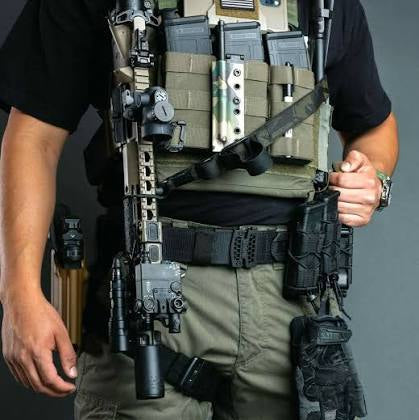
The centerline of your body is the most valuable real estate on your belt.
Equipment located near your centerline is generally accessible with either hand, even if one arm becomes injured or occupied.
As I build a belt, I always ask two questions:
What do I need to fight?
These are the tools that help solve immediate threats, such as:
- Spare magazines.
- Less-lethal options.
- Additional ammunition.
- Weapon support equipment.
For mission-critical carry solutions, browse our selection of High Speed Gear products, which are built for secure, accessible, and battle-ready placement.
What do I need to save?
These are the tools that preserve life after the fight:
- Individual First Aid Kit (IFAK).
- Tourniquet.
- Trauma supplies.
- Medical equipment.
Winning the fight is only half the equation. Being prepared to save a life afterward is just as important.
Every Inch Matters
Belt space is limited.
Look for opportunities to combine capabilities without sacrificing accessibility.
For example:
- Mounting a tourniquet to an IFAK.
- Using magazine pouches that accommodate multiple equipment types.
- Selecting accessories that maximize vertical space instead of horizontal space.
The goal isn’t to make your belt smaller.
The goal is to make it more efficient.
If you’re building a compact, layered setup, check out our Flatline Fiber Company gear for smart mounting options that help you make better use of limited belt real estate.
Think Vertically
One of the easiest ways to free up belt space is by stacking equipment vertically.
Instead of spreading equipment around your waist, use products that allow gear to be mounted above or in front of existing equipment while maintaining quick access.
This is an area where several products from Flatline Fiber Company excel. Their designs allow users to maximize limited belt space without creating unnecessary bulk.
Vertical organization also helps keep the belt balanced and can improve overall comfort during long shifts.
Don’t Sacrifice Mobility
A belt should support movement—not restrict it.
After building your setup, perform everyday tasks:
- Sit in your patrol vehicle.
- Drive for an extended period.
- Climb stairs.
- Kneel.
- Enter and exit doorways.
- Run.
- Get in and out of chairs.
If your gear constantly catches on seat belts, steering wheels, door frames, or furniture, your layout needs refinement.
The best belt setup is one you forget you’re wearing until you need it.
For duty-ready hardware that supports practical movement and access, explore our Zero9 collection of professional gear solutions.
Keep Your Two-Belt System Working Together
If you’re using an inner and outer belt system, pay attention to the hook-and-loop connection.
Every gap between the inner and outer belt reduces overall stability.
Try to minimize unnecessary break points whenever possible.
Fortunately, there are inexpensive solutions that make a noticeable difference.
Simple additions like adhesive hook material, One-Wrap, or small Velcro accessories can significantly improve belt retention, reduce shifting, and increase comfort throughout a long shift.
Small upgrades often provide the biggest return.
Get Weight Off Your Legs
Whenever practical, move equipment from your thigh back onto your belt.
Long drop-leg platforms were once extremely popular, but they introduce unnecessary movement, increase fatigue, and can restrict mobility.
Equipment mounted on your leg swings with every step, making running, climbing, kneeling, and entering vehicles more difficult.
Modern belt systems have become more supportive than ever.
Unless your mission specifically requires a lowered platform, keeping equipment mounted directly to your belt generally improves movement, comfort, and weapon accessibility.
Train With Your Gear Before You Need It
You can spend hours building the perfect belt setup, but none of it matters if you haven’t trained with it.
The first time you reach for a tourniquet, spare magazine, or less-lethal tool should never be during a real-world incident.
Every repetition you perform during training strengthens the neural pathways associated with that movement through a process known as myelination. Over time, those movements become faster, smoother, and more automatic under stress.
If you’ve spent years drawing a magazine or reaching for medical equipment from one location, then decide to move it, your brain doesn’t instantly update that map. Under stress, you’ll often default to where the equipment used to be because that’s where you’ve built thousands of repetitions.
This is why every change to your belt setup should be followed by deliberate training.
Practice your reloads.
Practice deploying your tourniquet.
Practice accessing your medical kit with either hand.
Practice drawing your less-lethal tools.
Practice from standing, kneeling, seated in a vehicle, and while moving.
Then increase the stress. Run before drills. Perform timed repetitions. Work in low-light conditions. Build confidence with your equipment until every movement is deliberate and instinctive.
Your gear isn’t truly operational until you’ve built enough quality repetitions that accessing it becomes second nature.
Build, Test, Adjust
No belt setup is perfect on day one.
Use it.
Train with it.
Drive with it.
Run with it.
Shoot with it.
Wear it for an entire shift.
Then make adjustments.
The best belt systems evolve over time as your experience grows and your mission changes.
Remember, your goal isn’t to fill every available inch of belt space.
Your goal is to carry the equipment that allows you to fight effectively, save lives when necessary, and perform your mission without your gear becoming a liability.
At Protection Design Concepts, we believe your equipment should work with you—not against you. Carefully selecting quality gear, placing it intentionally, and continually refining your setup will result in a belt system that’s comfortable, efficient, and ready when it matters most.
Browse our full selection of mission-ready tactical gear to build a setup that matches your mission and your movement.
Remember, the goal isn’t to carry more gear—it’s to carry the right gear, place it with purpose, and train until accessing it becomes second nature. Your equipment should support your mission, not complicate it. When your setup is built around your mission and reinforced through consistent training, you’ll perform more efficiently when it matters most.
Mission Complete.